As an embedded systems developer working primarily from home, I often need to remotely power-cycle development boards located in the office.
In the past, I’ve used a Denkovi USB Relay 4-port controller with some success. Wiring individual power supplies through this is fiddly though, and It’s not convenient to swap between different power supplies. It does provide a simple Windows GUI to control the outputs however.
I’ve also used a Lindy IPower Switch Classic 8, a network attached power strip which includes an Ethernet port and a built-in web UI to allow any socket to be turned off or on remotely. This works very well but at over £300, it’s a pricey option. Also, it uses IEC C13 sockets (as you might find on a UPS) which don’t work well for connecting standard wall-wart power supplies.
I’ve been looking for a simpler, cheaper solution. Zigbee Smart Plugs are widely available now, and very affordable, so adding a cheap USB Zigbee Controller to my office PC should let me turn them on and off with a simple command line instruction, right?
Of course, it turns out to be a bit more complicated than this. Most online guides recommend installing Home Assistant, an impressive package that can control your whole house. While it can definitely turn on and off a few Zigbee smart plugs, running it under Windows means setting up a Virtual Machine to host it. That seems like a lot of effort and CPU use for such a simple requirement.
Instead, I’ve figured out how to do it with some more basic tools. If you’re trying to do the same, follow along.
Background
Individual Zigbee devices communicate with the Zigbee USB dongle by sending (“publishing”) occasional messages, and receiving (“subscribing” to) messages from other devices or applications. A message broker sits between the devices and applications and co-ordinates these messages. Messages are published to specific topics, which are structured like paths in a filesystem; choosing the correct topic name is how an application targets a message at a particular device.
A key point is that a device does not need to be online when an application sends it a message. Similarly, a device can send a message without the recipient being connected. The broker keeps track of all of this and makes sure any pending messages are delivered the next time the recipient wakes up. This allows ZigBee devices to consume very little power as they don’t need to be constantly awake.
The protocol used for all of this is called MQTT. You’ll config files and diagnostic messages referencing URLs such as mqtt://localhost:1883/ which are used to identify a message broker listening on a particular sever and port. Mosquitto is the message broker we’ll use here; it’s a Windows service that implements the MQTT protocol.
As Mosquitto doesn’t know anything about ZigBee, we need another package to convert between the MQTT messages and raw ZigBee device operations. This package is Zigbee2MQTT.
Hardware
Most Zigbee hardware is well supported by Zigbee2MQTT, so it may pay to shop around. LIDL periodically have Smart Plug offers which reputedly work well. (You may need to replace the proprietary Tuya manufacturer firmware with an Open Source equivalent). For a simple life, I used these plugs from Amazon UK which worked out of the box:
- 1 x Sonoff Zigbee SmartPlug S26R2ZBTPG Outlet 4-pack (approx £40)
- 1 x PhosCon ConBee II USB to Zigbee dongle (approx £36)
Software
These packages are for Microsoft Windows. They are also available on Linux but you’ll need to adapt the instructions accordingly. I’ve listed the versions I used, but generally, go for the latest public release available in each case.
- Node v16.15.0 for Windows x64 – used to provide the environment for ZigBee2MQTT
- Mosquito 2.0.14 for Windows x64 – the message broker used to co-ordinate messages sent between applications and Zigbee devices
- Zigbee2MQTT-Master – the software bridge that sits between Zigbee devices on the USB dongle and the message broker.
- MQTT Explorer – a useful diagnostic tool to explore connected devices and test sending commands to them.
Installation
Run the Node installer. You may wish to click the box for “Automatically install the necessary tools. Note that this will also install Chocolately” but it’s not necessary for this specific application.
Next, run the Mosquitto installer. After installation, you will have a new Windows system service called “Mosquitto Broker”. Start this via the Windows service manager, or from an Administrator command prompt using the command net start “mosquitto broker”. (It will automatically start after a system reboot.)
To install Zigbee2MQTT, visit the Zigbee2MQTT repository page and use the green Code button to download a .zip file of the repository. Extract this to apermanent folder on your local drive where it will live (e.g. C:\Dev\Zigbee). Then open a command prompt, change to this folder and run “npm ci” to setup all the node dependencies.
After installation, edit the config file data\configuration.yaml and ensure it looks similar to this:
# Home Assistant integration (MQTT discovery)
homeassistant: false

# allow new devices to join
permit_join: true

# MQTT settings
mqtt:
  # MQTT base topic for zigbee2mqtt MQTT messages
  base_topic: zigbee2mqtt
  # MQTT server URL
  server: 'mqtt://localhost'
  # MQTT server authentication, uncomment if required:
  # user: my_user
  # password: my_password

# Serial settings
serial:
  # Location of CC2531 USB sniffer
  port: \\.\COM8
  adapter: deconz
The significant fields are highlighted. permit_join should normally be false but when setting up a new system, set it to true – this allows your smartplugs to pair with Zigbee2MQTT automatically.
Set the port field to the Windows COM device assigned to your USB Zigbee dongle. This may change if you move it to a different USB port so it’s best to always leave it in the same port if possible. The easiest way to identify the COM device is to open Windows Device Manager, expand the Ports tree and look at the COM ports that are currently listed. If there are several, unplug the Zigbee Dongle and check which one disappears; then reconnect the Dongle and you will see it reappearing. On my system, it appears as COM8.
The adapter: deconz field is needed when you are using the ConBee II USB dongle; if you are using a different brand, this may not be required. It ensures Zigbee2MQTT uses the right protocol to control the dongle.
After editing the configuration, start Zigbee2MQTT with the command npm start. If this is the first time, it will compile the system; subsequent starts will be faster.
In any case, you should shortly see output similar to this:
Building Zigbee2MQTT... (initial build), finished
Zigbee2MQTT:info  2022-06-15 10:28:57: Logging to console and directory: 'C:\Dev\Zigbee\zigbee2mqtt-master\data\log\2022-06-15.10-28-57' filename: log.txt
Zigbee2MQTT:info  2022-06-15 10:28:57: Starting Zigbee2MQTT version 1.25.2 (commit #unknown)
Zigbee2MQTT:info  2022-06-15 10:28:57: Starting zigbee-herdsman (0.14.34)
CREATED DECONZ ADAPTER
Zigbee2MQTT:info  2022-06-15 10:28:57: zigbee-herdsman started (resumed)
Zigbee2MQTT:info  2022-06-15 10:28:57: Coordinator firmware version: '{"meta":{"maintrel":0,"majorrel":38,"minorrel":114,"product":0,"revision":"0x26720400","transportrev":0},"type":"ConBee2/RaspBee2"}'
Zigbee2MQTT:info  2022-06-15 10:29:10: Currently 0 devices are joined:
Zigbee2MQTT:warn  2022-06-15 10:29:10: `permit_join` set to  `true` in configuration.yaml.
Zigbee2MQTT:warn  2022-06-15 10:29:10: Allowing new devices to join.
Zigbee2MQTT:warn  2022-06-15 10:29:10: Set `permit_join` to `false` once you joined all devices.
Zigbee2MQTT:info  2022-06-15 10:29:10: Zigbee: allowing new devices to join.
Zigbee2MQTT:info  2022-06-15 10:29:11: Connecting to MQTT server at mqtt://localhost
Zigbee2MQTT:info  2022-06-15 10:29:11: Connected to MQTT server
Zigbee2MQTT:info  2022-06-15 10:29:11: MQTT publish: topic 'zigbee2mqtt/bridge/state', payload 'online'
Zigbee2MQTT:info  2022-06-15 10:29:12: MQTT publish: topic 'zigbee2mqtt/bridge/config', payload '{"commit":"unknown","coordinator":{"meta": "maintrel":0,"majorrel":38,"minorrel":114,"product":0,"revision":"0x26720400","transportrev":0},
"type":"ConBee2/RaspBee2"},"log_level":"info","network":{"channel":11,"extendedPanID":"0xdddddddddddddddd","panID":6754},"permit_join":true,"version":"1.25.2"}'
If you have some Smartplugs connected to nearby sockets, and they are in pairing mode (which is the default when they are brand new), they may automatically register. Then you’ll see additional entries like this:
Zigbee2MQTT:info  2022-06-15 10:29:13: Device '0x00124b0024c1007e' joined
Zigbee2MQTT:info  2022-06-15 10:29:13: MQTT publish: topic 'zigbee2mqtt/bridge/event', payload '{"data":{"friendly_name":"0x00124b0024c1007e","ieee_address":"0x00124b0024c1007e"},"type":"device_joined"}'
Zigbee2MQTT:info  2022-06-15 10:29:13: MQTT publish: topic 'zigbee2mqtt/bridge/log', payload '{"message":{"friendly_name":"0x00124b0024c1007e"},"type":"device_connected"}'
Zigbee2MQTT:info  2022-06-15 10:29:13: Starting interview of '0x00124b0024c1007e'
Zigbee2MQTT:info  2022-06-15 10:29:13: MQTT publish: topic 'zigbee2mqtt/bridge/event', payload '{"data":{"friendly_name":"0x00124b0024c1007e","ieee_address":"0x00124b0024c1007e","status":"started"},
"type":"device_interview"}'
Zigbee2MQTT:info  2022-06-15 10:29:13: MQTT publish: topic 'zigbee2mqtt/bridge/log', payload '{"message":"interview_started","meta":{"friendly_name":"0x00124b0024c1007e"},"type":"pairing"}'
This means that a new device has been registered, and some MQTT topics have been created for it.
Finally, install MQTT Explorer. When it runs initially, you’ll see an MQTT Connection dialog. Use the ‘+‘ icon in the upper left corner to add a new connection called ‘localhost‘ with the Host field also set to ‘localhost‘.
If you open this connection, it will connect to your local Mosquitto broker. On the left, you’ll see a tree view like this:
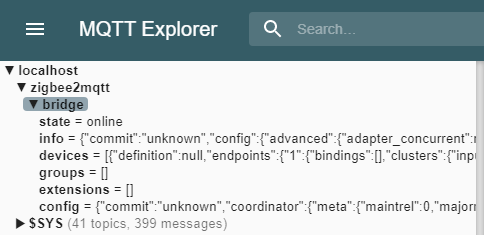
If you click on the devices line, the right-hand panel will show you the contents. This is a low-level view of the raw data, so it won’t mean too much to you at this point. It’s useful for checking if your devices have registered yet.
Configuration
What next? If you stop Zigbee2MQTT and check its data\configuration.yaml file once again, you may see some new entries at the bottom like this:
  devices:
    '0x00124b0024c1007e':
      friendly_name: '0x00124b0024c1007e'
    '0x00124b0024c10079':
      friendly_name: '0x00124b0024c10079'
    '0x00124b0024c1007a':
      friendly_name: '0x00124b0024c1007a'
    '0x00124b0024c10071':
      friendly_name: '0x00124b0024c10071'
These have been automatically added by Zigbee2MQTT during its discover phase. You may like to set the permit_join field to false to stop additional devices registering automatically.
You can edit the friendly_name for each device to something more recognisable. For now, I suggest ‘plug1‘, ‘plug2‘, ‘plug3‘ and ‘plug4‘.
Restart Zigbee2MQTT (‘npm start‘) and now the friendly names can be used to manipulate the plugs.
(If you get an error when restarting Zigbee2MQTT, either your configuration file has an error or you have another copy already running in the background. The console output usually indicates a more precise cause of failure.)
Plug Control
To recap, the Mosquitto Broker service is running in the background, acting as a central message co-ordinator, and Zigbee2MQTT is providing a bridge between Mosquitto and the USB dongle.
All we need now is a way to send messages to the smart plugs to turn them on and off. This is done by publishing messages to special topic names corresponding to the friendly names we assigned earlier.
The quickest way to do this is using MQTT Explorer. When connected to localhost, open the Publish pane on the right-hand side of the main window. Under topic, enter zigbee2mqtt/plug1/set and select json as the data format.
In the text box, enter this json string:
{ "state" : "ON" }
and click Publish. This will set the state attribute of plug1 to ON. The syntax here needs to be precise; both the attribute name and attribute value must be enclosed in double-quotation marks, and they are case-sensitive.
If everything is working, then plug1 should turn on and any connected device will power up. You can repeat this with the state set to OFF or TOGGLE, which should work as expected. Change the topic field to reference plug2, plug3, etc. to control other devices.
This works well for testing but is a little clunky to do on a regular basis. To achieve the same effect from the command line, use the mosquitto_pub tool included with Mosquitto. This is usually found in “C:\Program Files\Mosquitto“.
To turn on plug1 from a DOS command prompt, use this command:
mosquitto_pub -h localhost -t "zigbee2mqtt/plug1/set" -m "{ ""state"": ""ON"" }"
Note the repeated double-quotation marks around “state” and “ON” in the json string. These ensure the quotation marks are not stripped out by the command line parser before they reach mosquitto_pub.
This command and similar variations can be easily encapsulated in a small batch file to automate things further. Here is a script called resetplug.cmd to reboot a device connected to a specific plug:
@echo off
set DELAY=3
set MQTTPUB="C:\Program Files\Mosquitto\mosquitto_pub.exe"
if not z%1==z goto action
echo "Usage: resetplug <plugname> [ <delay> ]"
goto done

:action
echo Resetting %1...
set PLUGPATH=zigbee2mqtt/%1/set
if not z%2==z set DELAY=%2
%MQTTPUB% -h localhost -t "%PLUGPATH%" -m "{ ""state"" : ""OFF"" }"
timeout /t %DELAY% >nul
%MQTTPUB% -h localhost -t "%PLUGPATH%" -m "{ ""state"" : ""ON"" }"

:done
You can then use the command “resetplug plug1” to reset the device connected to plug1. For devices needing a longer reset period, add an optional delay, e.g.”resetplug plug3 5“.
After issuing these commands, you will notice additional topics appearing in the MQTT Explorer view. If you click on these topics, you can see the state of the plug changing in realtime. (This is useful if you are debugging more complex control scenarios.)
Conclusion
Following these simple steps makes it easy to control smart plugs from the command line. You’ll need to manually start Zigbee2Mqtt if you reboot your PC, or more sensibly, create a batch file to do this and add it to your Windows Startup folder.
If you add additional smart plugs in the future, just set permit_join to true in configuration.yaml temporarily to allow the plugs to register, then add a suitable friendly name and you’re all set.