While performing some maintenance and updates on an ancient Windows 2008 Server VM, I upgraded it to Service Pack 2, in an attempt to resolve various ongoing issues.
Shortly afterwards, I discovered Windows Update was no longer working; it gave an obscure failure code and all the usual efforts to revive it, such as flushing the software distribution cache, were unsuccessful. No matter — Windows 2008 Server is out of support anyway, so there are unlikely to be any important updates, right?
Some time later, I discovered that the recently upgraded VPOP3 mail server, running on the same machine, was complaining that it couldn’t access its activation server to verify its license. This wasn’t a critical failure, but it resulted in reduced functionality.
Checking the mail server logs revealed this error message:
“Server certificate verification failed. Connection aborted" Windows code 0x80090302
Hmm. I used Wireshark to monitor the network traffic when VPOP3 started up, and could see it issuing a HTTPS request to the remote activation server. However, the session ended immediately after the initial handshake — clearly something was amiss. I verified that Chrome running on the same machine could access the Activation website successfully; the issue appeared to be with the Windows 2008 SSL libraries.
A check of the Windows Application event log revealed lots of repeated CAPI2 error events every 10 minutes:
Next step was to visit the Applications and Services Logs in Event Viewer, then navigate to Microsoft / Windows / CAPI2 and right-click on the Operational Log to Enable CAPI2 logging. After doing so, a lot more detail about CAPI2 activity started to appear. (It’s a good idea to also increase the CAPI2 log size to 4096 Kb in Properties, as the default 1024 Kb can fill up very quickly.)
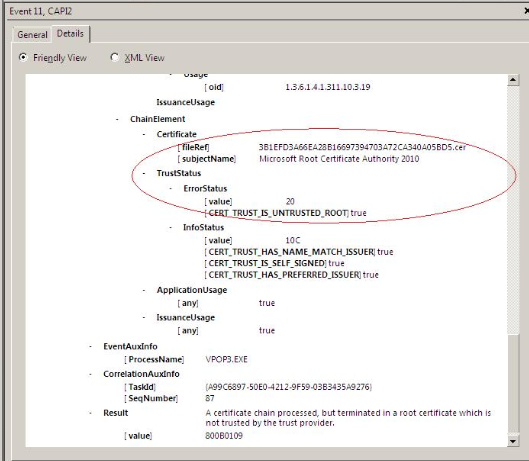
Repeating the activation test with this additional debugging enabled revealed a new error:
Very odd — apparently the Microsoft Root Certificate Authority 2010 was now considered untrusted. Just in case it had become corrupted, I used certmgr.msc to export a copy of this from another, newer machine and import it to the Windows 2008 Server instance, but this made no difference.
After some more research, I discovered John Thaller’s useful Root Certificate Updates For Legacy Windows github repository. Surely this would sort things out? Unfortunately, while it installed without issue, the problem remained.
Eventually, after a lot of further searching, I came across a Microsoft article from 2019 which described a plan to move Windows Update Services from SHA-1 signatures (now considered insecure) to SHA-2. A key part of this plan was that after August 2020, the Windows root certificates would no longer validate SHA-1 signatures, and all Windows Update Services would require SHA-2.
However, Windows 2008 Server SP2 doesn’t actually support SHA-2 verification. No problem – Microsoft were pushing an update that would add the needed SHA-2 support, so once that update was installed ahead of the transition deadline, everything would be good.
Christmas 2023 turned out to be NOT ahead of the transition deadline (missed it by more than three years, in fact) which explains why the server couldn’t access Windows Updates any more. As VPOP3’s Activation server appears to rely on a Microsoft certificate chain for authentication, it too fell victim to the lack of SHA-2 support.
Fortunately, there is a straightforward solution, as Microsoft describe in a follow-up article on How to Update Windows Devices to SHA-2. Microsoft made available a standalone SHA-2 update download page that has the correct installation file for a variety of different scenarios. Pick the one that matches your system, download and install, reboot, and you’re all set.
And indeed, after doing just that, everything started working normally once again!
All’s well that ends well, then. However, I do feel there was a missed opportunity here for the CAP2 logging to be a bit more explicit about the fact that it was the lack of SHA-2 signing support in the OS, or at least the lack of a verifiable signature in the provided certificate, that was the root cause of the failure – that would have saved a lot of time!
As an embedded systems developer working primarily from home, I often need to remotely power-cycle development boards located in the office.
In the past, I’ve used a Denkovi USB Relay 4-port controller with some success. Wiring individual power supplies through this is fiddly though, and It’s not convenient to swap between different power supplies. It does provide a simple Windows GUI to control the outputs however.
I’ve also used a Lindy IPower Switch Classic 8, a network attached power strip which includes an Ethernet port and a built-in web UI to allow any socket to be turned off or on remotely. This works very well but at over £300, it’s a pricey option. Also, it uses IEC C13 sockets (as you might find on a UPS) which don’t work well for connecting standard wall-wart power supplies.
I’ve been looking for a simpler, cheaper solution. Zigbee Smart Plugs are widely available now, and very affordable, so adding a cheap USB Zigbee Controller to my office PC should let me turn them on and off with a simple command line instruction, right?
Of course, it turns out to be a bit more complicated than this. Most online guides recommend installing Home Assistant, an impressive package that can control your whole house. While it can definitely turn on and off a few Zigbee smart plugs, running it under Windows means setting up a Virtual Machine to host it. That seems like a lot of effort and CPU use for such a simple requirement.
Instead, I’ve figured out how to do it with some more basic tools. If you’re trying to do the same, follow along.
Background
Individual Zigbee devices communicate with the Zigbee USB dongle by sending (“publishing”) occasional messages, and receiving (“subscribing” to) messages from other devices or applications. A message broker sits between the devices and applications and co-ordinates these messages. Messages are published to specific topics, which are structured like paths in a filesystem; choosing the correct topic name is how an application targets a message at a particular device.
A key point is that a device does not need to be online when an application sends it a message. Similarly, a device can send a message without the recipient being connected. The broker keeps track of all of this and makes sure any pending messages are delivered the next time the recipient wakes up. This allows ZigBee devices to consume very little power as they don’t need to be constantly awake.
The protocol used for all of this is called MQTT. You’ll config files and diagnostic messages referencing URLs such as mqtt://localhost:1883/ which are used to identify a message broker listening on a particular sever and port. Mosquitto is the message broker we’ll use here; it’s a Windows service that implements the MQTT protocol.
As Mosquitto doesn’t know anything about ZigBee, we need another package to convert between the MQTT messages and raw ZigBee device operations. This package is Zigbee2MQTT.
Hardware
Most Zigbee hardware is well supported by Zigbee2MQTT, so it may pay to shop around. LIDL periodically have Smart Plug offers which reputedly work well. (You may need to replace the proprietary Tuya manufacturer firmware with an Open Source equivalent). For a simple life, I used these plugs from Amazon UK which worked out of the box:
These packages are for Microsoft Windows. They are also available on Linux but you’ll need to adapt the instructions accordingly. I’ve listed the versions I used, but generally, go for the latest public release available in each case.
Node v16.15.0 for Windows x64 – used to provide the environment for ZigBee2MQTT
Mosquito 2.0.14 for Windows x64 – the message broker used to co-ordinate messages sent between applications and Zigbee devices
Zigbee2MQTT-Master – the software bridge that sits between Zigbee devices on the USB dongle and the message broker.
MQTT Explorer – a useful diagnostic tool to explore connected devices and test sending commands to them.
Installation
Run the Node installer. You may wish to click the box for “Automatically install the necessary tools. Note that this will also install Chocolately” but it’s not necessary for this specific application.
Next, run the Mosquitto installer. After installation, you will have a new Windows system service called “Mosquitto Broker”. Start this via the Windows service manager, or from an Administrator command prompt using the command net start “mosquitto broker”. (It will automatically start after a system reboot.)
To install Zigbee2MQTT, visit the Zigbee2MQTT repository page and use the green Code button to download a .zip file of the repository. Extract this to apermanent folder on your local drive where it will live (e.g. C:\Dev\Zigbee). Then open a command prompt, change to this folder and run “npm ci” to setup all the node dependencies.
After installation, edit the config file data\configuration.yaml and ensure it looks similar to this:
# Home Assistant integration (MQTT discovery)
homeassistant: false
# allow new devices to join
permit_join: true
# MQTT settings
mqtt:
# MQTT base topic for zigbee2mqtt MQTT messages
base_topic: zigbee2mqtt
# MQTT server URL
server: 'mqtt://localhost'
# MQTT server authentication, uncomment if required:
# user: my_user
# password: my_password
# Serial settings
serial:
# Location of CC2531 USB sniffer
port: \\.\COM8adapter: deconz
The significant fields are highlighted. permit_join should normally be false but when setting up a new system, set it to true – this allows your smartplugs to pair with Zigbee2MQTT automatically.
Set the port field to the Windows COM device assigned to your USB Zigbee dongle. This may change if you move it to a different USB port so it’s best to always leave it in the same port if possible. The easiest way to identify the COM device is to open Windows Device Manager, expand the Portstree and look at the COM ports that are currently listed. If there are several, unplug the Zigbee Dongle and check which one disappears; then reconnect the Dongle and you will see it reappearing. On my system, it appears as COM8.
The adapter: deconz field is needed when you are using the ConBee II USB dongle; if you are using a different brand, this may not be required. It ensures Zigbee2MQTT uses the right protocol to control the dongle.
After editing the configuration, start Zigbee2MQTT with the command npm start. If this is the first time, it will compile the system; subsequent starts will be faster.
In any case, you should shortly see output similar to this:
Building Zigbee2MQTT... (initial build), finished
Zigbee2MQTT:info  2022-06-15 10:28:57: Logging to console and directory: 'C:\Dev\Zigbee\zigbee2mqtt-master\data\log\2022-06-15.10-28-57' filename: log.txt
Zigbee2MQTT:info  2022-06-15 10:28:57: Starting Zigbee2MQTT version 1.25.2 (commit #unknown)
Zigbee2MQTT:info  2022-06-15 10:28:57: Starting zigbee-herdsman (0.14.34)
CREATED DECONZ ADAPTER
Zigbee2MQTT:info  2022-06-15 10:28:57: zigbee-herdsman started (resumed)
Zigbee2MQTT:info  2022-06-15 10:28:57: Coordinator firmware version: '{"meta":{"maintrel":0,"majorrel":38,"minorrel":114,"product":0,"revision":"0x26720400","transportrev":0},"type":"ConBee2/RaspBee2"}'
Zigbee2MQTT:info  2022-06-15 10:29:10: Currently 0 devices are joined:
Zigbee2MQTT:warn  2022-06-15 10:29:10: `permit_join` set to  `true` in configuration.yaml.
Zigbee2MQTT:warn  2022-06-15 10:29:10: Allowing new devices to join.
Zigbee2MQTT:warn  2022-06-15 10:29:10: Set `permit_join` to `false` once you joined all devices.
Zigbee2MQTT:info  2022-06-15 10:29:10: Zigbee: allowing new devices to join.
Zigbee2MQTT:info  2022-06-15 10:29:11: Connecting to MQTT server at mqtt://localhost
Zigbee2MQTT:info  2022-06-15 10:29:11: Connected to MQTT server
Zigbee2MQTT:info  2022-06-15 10:29:11: MQTT publish: topic 'zigbee2mqtt/bridge/state', payload 'online'
Zigbee2MQTT:info  2022-06-15 10:29:12: MQTT publish: topic 'zigbee2mqtt/bridge/config', payload '{"commit":"unknown","coordinator":{"meta": "maintrel":0,"majorrel":38,"minorrel":114,"product":0,"revision":"0x26720400","transportrev":0},
"type":"ConBee2/RaspBee2"},"log_level":"info","network":{"channel":11,"extendedPanID":"0xdddddddddddddddd","panID":6754},"permit_join":true,"version":"1.25.2"}'
If you have some Smartplugs connected to nearby sockets, and they are in pairing mode (which is the default when they are brand new), they may automatically register. Then you’ll see additional entries like this:
This means that a new device has been registered, and some MQTT topics have been created for it.
Finally, install MQTT Explorer. When it runs initially, you’ll see an MQTT Connection dialog. Use the ‘+‘ icon in the upper left corner to add a new connection called ‘localhost‘ with the Host field also set to ‘localhost‘.
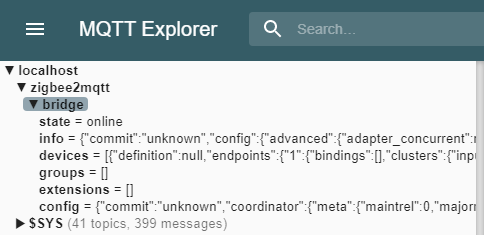
If you open this connection, it will connect to your local Mosquitto broker. On the left, you’ll see a tree view like this:
If you click on the devices line, the right-hand panel will show you the contents. This is a low-level view of the raw data, so it won’t mean too much to you at this point. It’s useful for checking if your devices have registered yet.
Configuration
What next? If you stop Zigbee2MQTT and check its data\configuration.yaml file once again, you may see some new entries at the bottom like this:
These have been automatically added by Zigbee2MQTT during its discover phase. You may like to set the permit_join field to false to stop additional devices registering automatically.
You can edit the friendly_name for each device to something more recognisable. For now, I suggest ‘plug1‘, ‘plug2‘, ‘plug3‘ and ‘plug4‘.
Restart Zigbee2MQTT (‘npm start‘) and now the friendly names can be used to manipulate the plugs.
(If you get an error when restarting Zigbee2MQTT, either your configuration file has an error or you have another copy already running in the background. The console output usually indicates a more precise cause of failure.)
Plug Control
To recap, the Mosquitto Broker service is running in the background, acting as a central message co-ordinator, and Zigbee2MQTT is providing a bridge between Mosquitto and the USB dongle.
All we need now is a way to send messages to the smart plugs to turn them on and off. This is done by publishing messages to special topic names corresponding to the friendly names we assigned earlier.
The quickest way to do this is using MQTT Explorer. When connected to localhost, open the Publish pane on the right-hand side of the main window. Under topic, enter zigbee2mqtt/plug1/set and select json as the data format.
In the text box, enter this json string:
{ "state" : "ON" }
and click Publish. This will set the state attribute of plug1 to ON. The syntax here needs to be precise; both the attribute name and attribute value must be enclosed in double-quotation marks, and they are case-sensitive.
If everything is working, then plug1 should turn on and any connected device will power up. You can repeat this with the state set to OFF or TOGGLE, which should work as expected. Change the topic field to reference plug2, plug3, etc. to control other devices.
This works well for testing but is a little clunky to do on a regular basis. To achieve the same effect from the command line, use the mosquitto_pub tool included with Mosquitto. This is usually found in “C:\Program Files\Mosquitto“.
To turn on plug1 from a DOS command prompt, use this command:
Note the repeated double-quotation marks around “state” and “ON” in the json string. These ensure the quotation marks are not stripped out by the command line parser before they reach mosquitto_pub.
This command and similar variations can be easily encapsulated in a small batch file to automate things further. Here is a script called resetplug.cmd to reboot a device connected to a specific plug:
@echo off
set DELAY=3
set MQTTPUB="C:\Program Files\Mosquitto\mosquitto_pub.exe"
if not z%1==z goto action
echo "Usage: resetplug <plugname> [ <delay> ]"
goto done

:action
echo Resetting %1...
set PLUGPATH=zigbee2mqtt/%1/set
if not z%2==z set DELAY=%2
%MQTTPUB% -h localhost -t "%PLUGPATH%" -m "{ ""state"" : ""OFF"" }"
timeout /t %DELAY% >nul
%MQTTPUB% -h localhost -t "%PLUGPATH%" -m "{ ""state"" : ""ON"" }"

:done
You can then use the command “resetplug plug1” to reset the device connected to plug1. For devices needing a longer reset period, add an optional delay, e.g.”resetplug plug3 5“.
After issuing these commands, you will notice additional topics appearing in the MQTT Explorer view. If you click on these topics, you can see the state of the plug changing in realtime. (This is useful if you are debugging more complex control scenarios.)
Conclusion
Following these simple steps makes it easy to control smart plugs from the command line. You’ll need to manually start Zigbee2Mqtt if you reboot your PC, or more sensibly, create a batch file to do this and add it to your Windows Startup folder.
If you add additional smart plugs in the future, just set permit_join to true in configuration.yaml temporarily to allow the plugs to register, then add a suitable friendly name and you’re all set.
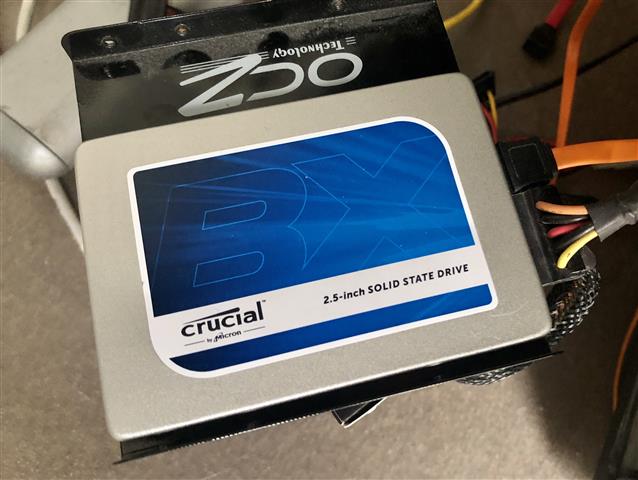
My development PC from five years ago was relegated to secondary status when I upgraded. Now it acts as my main backup server for the network, and also an occasional disk copy station when I want to copy or recover drives without disrupting my main machine.
It uses a Crucial CT500BX SSD as its C: drive and over the past few months this has been acting up — occasionally after installing Windows updates and rebooting overnight, the system would report no boot drive available. This was a minor pain since it would sometimes take several days before I noticed, during which time nightly backups weren’t taking place. It would always come back correctly when I went into the BIOS and reselected the correct boot device.
A few days ago, however, it stopped working entirely and no amount of coaxing would bring it back to life. I was at the point of just giving up, when I stumbled across a recovery technique that was I hadn’t seen before. I tried it, and it worked!
The trick is to unplug power & data cables from the SSD, then connect power-only and let it sit for 30 minutes. Then disconnect power for 30 seconds, reconnect it, and leave it for another 30 mins. Finally, power everything down, connect both power and data cables, and if all is well, then your drive will be working again.
So, what’s going on? It seems that most SSDs have a built-in failsafe which kicks in after 30 minutes without any data activity. This will scrub any internal cache, return various settings to default, and generally put the drive back to a known good starting state. Crucially, it does this without affecting your drive’s data.
How does the drive get into this bad state? It’s unclear, but may occur if you shut it down while it’s in the middle of an internal update operation; another factor may be its internal garbage collection, which erases data blocks that are no longer in use, to have them free for the next write operation — if a drive is running close to full, the garbage collector may be working overtime and could eventually get itself into a knot.
Regardless of the cause, I was sceptical – but it worked! It’s easy to try, and a good trick to have in your arsenal.
A good description of the precise procedure is on David Farquhar’s blog. Crucial themselves outline a similar process on their SSD FAQ. Once you know what to look for, there’s plenty of other discussion about this online too.
However, I’ve finally found a way to make a statically configured default route properly persistent across reboots (something that other operating systems, and older versions of Windows, have no trouble doing at all).
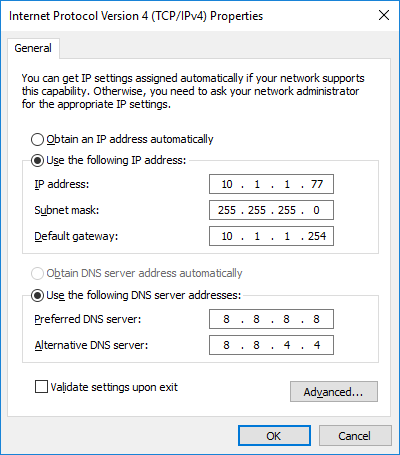
To recap: for various reasons, I assign static IP addresses to most of my PCs instead of using DHCP to allocate them automatically. As part of the configuration I specify a default gateway to the Internet, like this:
Windows 10 appears unable to remember this default gateway across reboots, especially when I have additional IP subnets configured on the same network interface.
This isn’t a big deal if I’m sitting in front of the PC, since I can fix it quickly. However, it’s a show-stopper if I need to access the PC remotely since it is no longer connected to the Internet. When it happens with our main family PC, it’s even more annoying since the steps to resolve it are not intuitive for my wife and sons.
Today, after yet another such unplanned outage (thank you, Windows Updates), a lightbulb finally went off in my head — why not use the existing Windows Persistent Route capability to add a persistent default route? I’ve now tried this approach on several PCs and it seems to work reliably!
So without further ado, if you too are suffering from this problem, here’s how to fix it.
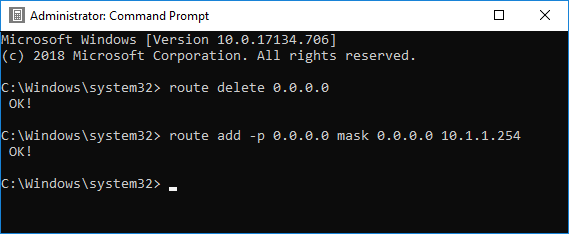
Open a command prompt with Administrator privileges by right-clicking on the Command Prompt option and selecting Run As Administrator, or pressing <WindowsKey>-<R>, typing CMD in the Run box, and pressing <CTRL>-<SHIFT>-<Enter>
Type ROUTE DELETE 0.0.0.0 to delete any existing default route; if you don’t have one at the moment, this will give an error which is fine.
Type ROUTE ADD -p 0.0.0.0 MASK 0.0.0.0 10.1.1.254 to add a new default route using the IP router gateway 10.1.1.254; replace this with your own gateway IP.
That’s it! Your default route should now be added back automatically whenever you reboot. If you need to change to a different default route, just repeat the steps above.
My dad has a Samsung Smart TV (UE55H6400) which he uses mostly as a display device for his Sky+ box; the advanced features of the TV are a little beyond him.
Recently though, he’s been asking for a way to play movies locally. When we met for lunch, I gave him an 8 GB USB flash drive with some films and later, over the phone, I walked him through selecting the USB device for playback using the Samsung TV remote.
This should have been straightforward – it certainly is on my older Samsung TV. But no dice – whatever we tried, his TV wouldn’t recognize the flash drive. There are three USB ports, including one labelled “USB HDD” but it made no difference which one we used.
Perhaps I had accidentally formatted the flash drive using NTFS instead of FAT32? My mum, who is a lot more computer literate than my dad, plugged the flash drive into their PC and I examined it using Remote Desktop. Sure enough, it was formatted as NTFS. While the newest Samsungs can handle this fine, my Dad’s model is a few years old so conceivably it was expecting FAT32.
Copying the movies to the PC, reformatting the drive, and copying them back again took about 20 minutes (cheap USB flash drives are SLOW). Ultimately, it made no difference – the TV still refused to recognize the drive. We gave it up as a bad job.
A week later, I was visiting and had a chance to try it myself – exactly the same results. At least user error wasn’t to blame.
Eventually we figured it out – it’s rather obscure! It seems that at least some models of Samsung TV decide whether or not a USB device is “hard drive”-like based on the precise way it is formatted. A single partition doesn’t count; it needs to have a full partition table with multiple partitions for the TV to recognize it as a valid drive.
How do you format it like this? The easiest option is to use a special tool like RMPrepUSB – download the latest version from the list on the home page.
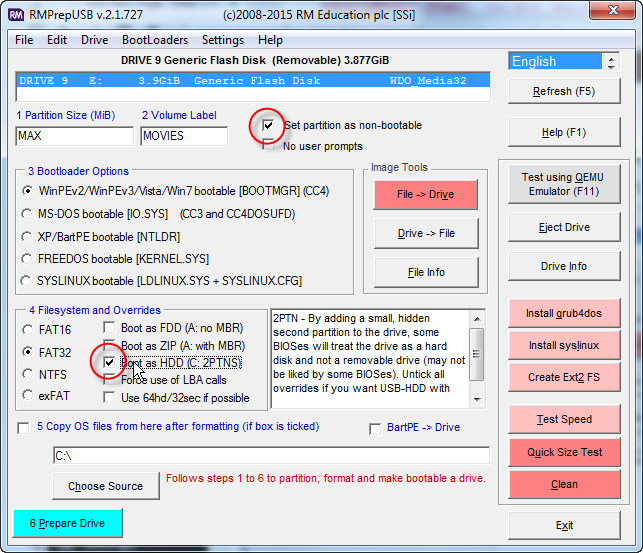
RMPrepUSB’s initial options screen looks rather daunting:
It’s not too bad though if you just follow through the numbered sections:
Select your USB drive from the list at the top
In section 2, type a suitable Volume Label and set the partition as non-bootable
In section 4, select FAT32 and choose “Boot as HDD”
Click the Prepare Drive button at the bottom and off you go.
After a brief delay, you’ll have a freshly formatted USB flash drive that is now recognized by your Samsung Smart TV. Copy movies, photos or music to it and have fun!
I should emphasise that this only seems to be necessary for some models of Samsung TV (and also, reportedly, LG TVs); it wasn’t needed for my own model.
If RMPrepUSB seems a little too daunting, you could also try Rufus by Pete Batard of Akeo, only up the road in Co. Donegal. While I haven’t had a chance to use it for this particular application yet, using the Advanced option “Add fixes for old BIOSes” option should have the same effect. Please let me know if it works for you!