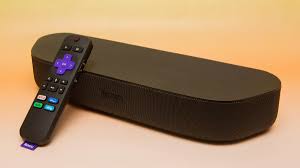
My brother has a Roku Streambar but had difficulty getting it to work reliably. The network connection test reported that both the Wired link and the Internet link were working correctly. However, most of the streaming services wouldn’t start.
As this was tricky to figure out, I’m recording the solution here for the benefit of anyone else with the same problem. (There are quite a few posts on Roku-related forums with similar sounding symptoms.)
The Solution
An old Zyxel D1000 DSL router (supplied by Eir) had been repurposed to use as a Wi-Fi access point in one of my brother’s sheds. This was linked to the main house network via one of its LAN ports. Its built-in DHCP server had been disabled, so its only purpose was to provide Wi-Fi access.
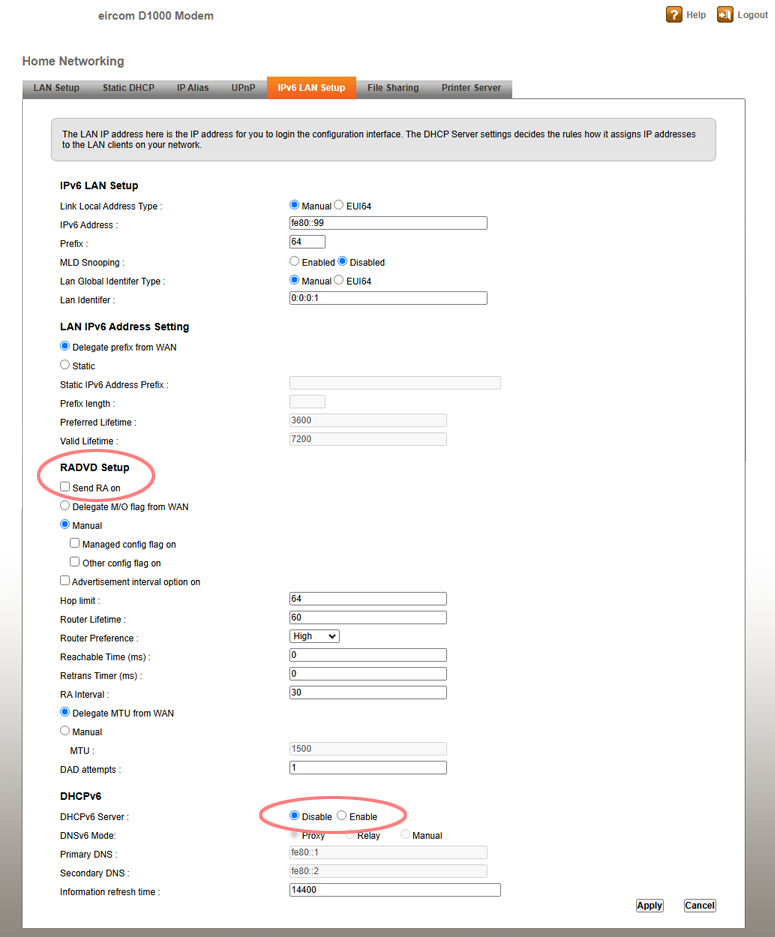
It turns out that this Zyxel model has separate DHCP servers for IPv4 and IPv6 traffic. The IPv4 DHCP server had been successfully disabled, but the IPv6 server, which is configured on a separate page, was still enabled. In addition, IPv6 RA (Router Advertisement) was also still enabled. This meant the Zyxel router was periodically advertising itself as a good place for IPv6 clients to direct traffic. Since the router was no longer directly wired to the Internet, this didn’t work very well.
The solution was to disable both IPv6 DHCP server and IPv6 RA (Router Advertisements) on the Zyxel, and then restart the Roku.
After doing so, the Roku could connect reliably to the Internet once again and streaming services worked as expected. The Zyxel’s IPv6 configuration page looked like this after disabling the relevant IPv6 options:

(It’s also wise to disable the UPnP support on the previous tab, just to ensure it doesn’t confuse any UPnP-aware devices on the same LAN.)
Troubleshooting Approach
If you’re interested in the approach used to diagnose this issue, read on.
My brother’s home networking setup uses a Vodafone 500 Mbps FTTH connection. The Vodafone router provides Wi-Fi access in the main house and is also the main gateway to the Internet. There are four auxiliary Wi-Fi access points located in outhouses and sheds. All of these are wired back to the main router using direct Ethernet links, and all the access points use the same SSID. They all have static IP addresses on the 192.168.1.x network.
The Vodafone router is configured as the main DHCP server for the LAN and provides dynamic IP addresses to the other network devices (PCs, laptops, phones, tablets, Sonos speakers, Smart TVs, Roku Streambar).
The Roku was connected to the network using Wi-Fi; this is the only option for the Streambar out of the box as it does not include an onboard Ethernet port. Initially, I suspected an issue with the Wi-Fi connection due to the Roku’s location. The Wi-Fi connectivity check worked okay, but it seemed prudent to eliminate it.
We added a cheap USB Ethernet port from Amazon and ran a fresh Ethernet cable from the Roku to the nearest network switch. The Roku’s connection test confirmed that this had improved throughput, but it didn’t make any difference to the streaming apps — they still couldn’t connect.
After trying several things, including a full reset of the Roku, I decided to bring it back to my house to continue trouble-shooting. To my surprise, it worked perfectly when connected to my own network. I was able to update the Roku firmware to the latest version and also update the various apps. I ran it for a couple of days to make sure there were no intermittant issues, and it was flawless.
However, when I brought it back to my brother’s house, we were no further on — it still failed to connect.
Network Debugging
This time, I had come armed with my main networking debug tool: a cheap Netgear GS105E managed switch. For around €25, this compact device offers five Gigabit Ethernet ports that are individually configurable. One of the ports can be assigned as a Mirror port, which is ideal for monitoring traffic between two Ethernet devices.
This switch is small enough to fit in my networking toolkit, and I keep it permanently configured so that Port 5 automatically mirrors all the traffic in and out of Port 1. I connect the device being debugged to Port 1, with Port 2 connected to the rest of the network and Port 5 to my Windows laptop. Wireshark running on my laptop can then capture all network traffic in both directions.
(If this approach wasn’t used, Wireshark could see broadcast packets from the device, but most other traffic would be invisible as the network switch or router the device is connected to would transmit the packet directly to the Internet router, bypassing the port Wireshark is connected to.)
You can also use this setup to, for example, monitor all Wi-Fi traffic coming via an access point to the rest of the LAN, or all traffic between LAN devices and the main Internet router – it’s merely a question of where you insert the switch into the network.
For best results, it is a good idea to turn off IPv4 and IPv6 network options on the laptop’s Ethernet adapter; this cuts down on the amount of traffic caused by Windows on the laptop trying to check what is out there.
Analysing The Network Traffic
After inserting the Netgear switch between the Roku and the main LAN, I carried out a simple test: asking the Roku to check for a firmware update. This was consistently failing to connect, and I figured it would generate very little network traffic making it easy to analyse.
Initially, I accidentally created a network loop by forgetting to turn off Wi-fi on my laptop. This caused traffic from the laptop’s Ethernet adapter in promiscuous mode to be broadcast on the Wi-Fi link (I may have enabled routing on my laptop at some point in the past). Over the course of 15 seconds or so, I amassed nearly 1,000,000 packets of network traffic – quite impressive, even if almost all of them were duplicates!
Once I figured that out, and disabled the Wi-Fi temporarily, things settled down and I was able to get a more useful trace. You can download it here if interested:
Initially, I filtered by the Roku’s IP address (192.168.1.34) in order to get rid of unrelated broadcast traffic and what looked like inter-switch advertisement packets. At a first glance, I could see that DNS lookups were failing in what appeared to be an odd way:

The Roku was sending a DNS query for lagrange.sw.roku.com and it appeared the Internet gateway was responding with an appropriate response. However, when that response was delivered to the Roku, it replied with the ICMP error Destination unreachable.
I carefully checked the UDP port numbers on the original request and response packets and they matched correctly, so it seemed odd that the Roku wouldn’t accept something it had asked for a mere six milliseconds earlier!
I did some similar tests without success, and was unable to figure it out. Eventually, as it was getting late, I packed up my gear and headed home — fortunately taking with me a copy of the Wireshark trace so I could analyze it later.
Once home, I took another look. This time, I filtered on the hardware MAC address of the Roku, rather than the IP address:

Aha! The Roku was sending out two DNS queries — one from its IPv6 address, to a Zyxel device, and one from its IPv4 address, to the main Internet router. The Zyxel replied first, giving the IP address 207.69.188.186 as the IP address associated with lagrange.sw.roku.com. As the DNS enquiry had now been satisfied, it no longer needed to wait around for the result of the parallel IPv4 DNS lookup. Hence, the ‘Port unreachable’ error when that result arrived.
Further tests showed that the Zyxel was returning this IP address for any DNS lookup.
What was this Zyxel device? A quick cross-check of its MAC address against the various Wi-Fi access points on the LAN showed that it was in fact an older ADSL D1000 router supplied by Eir, the national Irish phone company & Internet provider. This had provided slow Internet access prior to the long-awaited upgrade to fiber and was now being used to provide Wi-Fi coverage in one of the sheds.
I connected to the Zyxel’s web interface and sure enough, it still had its IPv6 subsystem enabled. I disabled the IPv6 DHCP server expecting that would resolve the issue. However, it did not! It was only after I also disabled the IPv6 RA (Router Advertisement) feature and restarted the Roku that everything finally returned to normal. Finally, it could run streaming applications once more.
Making Sense Of Nonsense
Why did the Internet connection test succeed on the Roku when almost all other Internet access was failing? While I can’t say for sure, I suspect the Roku does an initial connection probe when it starts up. At this point, it has obtained an IPv4 address from the Internet router using DHCP but the Zyxel router has not yet broadcast a Router Advertisement (RA’s are broadcast approximately every 200 seconds).
So, the Roku can connect to its target server on the Internet to verify connectivity without issue, and it then caches the DNS entry it looked up. It re-uses this IP address for further connectivity tests without needing to do another DNS lookup, and as it is an IPv4 address, it uses the IPv4 gateway (the main Internet router) to connect to it.
Within a minute or two of startup, the Roku will have received an IPv6 RA from the Zyxel and it then uses this path for further DNS lookups, in addition to the IPv4 path to the Internet router. As the Zyxel always replies first (within a milisecond or so), that reply beats the one coming from the real Internet. As its reply appears legitimate, the Roku then attempts to connect to 207.69.188.186 and times out when it doesn’t receive the expected response.
So what is this IP address 207.69.188.186? It doesn’t have any connection to the real IP address associated with lagrange.sw.roku.com.
It seems that when the Zyxel has no Internet connection, it serves up this IP address by default as the response for all UDP DNS queries. This has been previously discussed by other Zyxel users, and appears to be an odd quirk of their firmware.
(After some Googling, I discovered that this IP address also appears in example network traces in some of their documentation.)
I was sure I’d heard this IP address before. After checking some old records, I realised it had turned up while I was diagnosing a network connectivity issue with Sky TV for my sister. Her house also had an old Eir D1000 router on the LAN providing Wi-Fi access. I had disabled DHCP access on that router, but had missed the IPv6 configuration. Eventually, a year or two ago, that unit had been replaced by a TP-Link dedicated Wi-Fi device and all the connectivity issues with her Sky TV box had gone away, though I hadn’t made the connection at the time.
So, mystery solved!
In summary, if you arrived here because you were wondering why 207.69.188.186 has appeared on your network traces, track down any Zyxel home routers and reconfigure them or replace them with something more modern.
Bonus Russian Explanation!
The blog post mentioned a couple of paragraphs earlier contains a link to a Russian Zyxel Knowledge Base article that goes into a lot more detail about what is happening here. That page has been offline for more than a decade, but happily archive.org kept a copy. For your convenience it is reproduced here, translated to English courtesy of Google.
(From https://web.archive.org/web/20101127161654/http://zyxel.ru/content/support/knowledgebase/KB-1228)
DNS query problem in P-660R EE
| Question: When using the P-660R EE modem, the following problem arose: “When accessing any name, DNS starts returning only www.kimo.com.tw. The modem responds in this way to any request to any server. What is the problem and how can I solve it?” |
| Answer: First of all, I would like to explain where the need for the address www.kimo.com.tw came from. This is not a hidden Trojan, but a mechanism necessary for implementing the “zero configuration” function. Here’s how it works: 1. When you try to connect to, say, www.zyxel.ru, the PC sends a DNS query to the modem. 2. If the modem was previously reset to factory configuration, it launches the ” vc-hunting ” mechanism – it goes through the list of VPI, VCI and Internet provider encapsulations built into it until it establishes a logical connection. At this time, www.zyxel.ru is not yet available. 3. At the same time, the modem responds from a fake IP address, as if from “207.69.188.186” (“www.kimo.com.tw”). 4. The PC tries to get an IP address by sending an HTTP request to the modem. 5. The modem, having received this IP address, responds with a corresponding HTML page with a message about the current status of the null configuration process. This entire process is used only to display the execution of the webredirect function , while there is no real connection to the Internet, i.e. with www.zyxel.ru.If you do not want to use this mechanism, use a new firmware that has the ability to disable it. Disabling is done via the command line, by establishing a telnet connection to the modem, in menu 24.8, with the following commands: 1. “wan atm vc dis ” (checking the current status of VC hunt and webredirect) 2. “wan atm vc webredir 1/0(1=disable;0=enable) “ 3. “wan atm vc save ” (saving the configuration in non-volatile memory) Also, don’t forget that the PC has a cache and after you disable the webredirect function, it may still be erroneously routed to “www.kimo.com.tw” for some time until the cache is cleared. The firmware in which you can disable the webredirection function is attached to this article – http://zyxel.ru/content/support/knowledgebase/KB-1228/340UH3C0_20051101.zip |
| Applies to products:P-660REEP-660R EE (Annex A) |


 There’s been plenty of debate and

