While performing some maintenance and updates on an ancient Windows 2008 Server VM, I upgraded it to Service Pack 2, in an attempt to resolve various ongoing issues.
Shortly afterwards, I discovered Windows Update was no longer working; it gave an obscure failure code and all the usual efforts to revive it, such as flushing the software distribution cache, were unsuccessful. No matter — Windows 2008 Server is out of support anyway, so there are unlikely to be any important updates, right?
Some time later, I discovered that the recently upgraded VPOP3 mail server, running on the same machine, was complaining that it couldn’t access its activation server to verify its license. This wasn’t a critical failure, but it resulted in reduced functionality.
Checking the mail server logs revealed this error message:
“Server certificate verification failed. Connection aborted" Windows code 0x80090302
Hmm. I used Wireshark to monitor the network traffic when VPOP3 started up, and could see it issuing a HTTPS request to the remote activation server. However, the session ended immediately after the initial handshake — clearly something was amiss. I verified that Chrome running on the same machine could access the Activation website successfully; the issue appeared to be with the Windows 2008 SSL libraries.
A check of the Windows Application event log revealed lots of repeated CAPI2 error events every 10 minutes:
Failed extract of third-party root list from auto update cab at: http://www.download.windowsupdate.com/msdownload/update/v3/static/trustedr/en/authrootstl.cab with error: A certificate chain processed, but terminated in a root certificate which is not trusted by the trust provider.
Next step was to visit the Applications and Services Logs in Event Viewer, then navigate to Microsoft / Windows / CAPI2 and right-click on the Operational Log to Enable CAPI2 logging. After doing so, a lot more detail about CAPI2 activity started to appear. (It’s a good idea to also increase the CAPI2 log size to 4096 Kb in Properties, as the default 1024 Kb can fill up very quickly.)
Repeating the activation test with this additional debugging enabled revealed a new error:
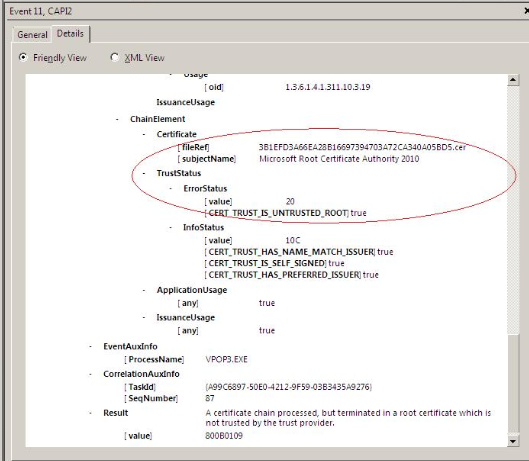
Very odd — apparently the Microsoft Root Certificate Authority 2010 was now considered untrusted. Just in case it had become corrupted, I used certmgr.msc to export a copy of this from another, newer machine and import it to the Windows 2008 Server instance, but this made no difference.
After some more research, I discovered John Thaller’s useful Root Certificate Updates For Legacy Windows github repository. Surely this would sort things out? Unfortunately, while it installed without issue, the problem remained.
Eventually, after a lot of further searching, I came across a Microsoft article from 2019 which described a plan to move Windows Update Services from SHA-1 signatures (now considered insecure) to SHA-2. A key part of this plan was that after August 2020, the Windows root certificates would no longer validate SHA-1 signatures, and all Windows Update Services would require SHA-2.
However, Windows 2008 Server SP2 doesn’t actually support SHA-2 verification. No problem – Microsoft were pushing an update that would add the needed SHA-2 support, so once that update was installed ahead of the transition deadline, everything would be good.
Christmas 2023 turned out to be NOT ahead of the transition deadline (missed it by more than three years, in fact) which explains why the server couldn’t access Windows Updates any more. As VPOP3’s Activation server appears to rely on a Microsoft certificate chain for authentication, it too fell victim to the lack of SHA-2 support.
Fortunately, there is a straightforward solution, as Microsoft describe in a follow-up article on How to Update Windows Devices to SHA-2. Microsoft made available a standalone SHA-2 update download page that has the correct installation file for a variety of different scenarios. Pick the one that matches your system, download and install, reboot, and you’re all set.
And indeed, after doing just that, everything started working normally once again!
All’s well that ends well, then. However, I do feel there was a missed opportunity here for the CAP2 logging to be a bit more explicit about the fact that it was the lack of SHA-2 signing support in the OS, or at least the lack of a verifiable signature in the provided certificate, that was the root cause of the failure – that would have saved a lot of time!